Quick Answer
- A blown car speaker usually shows up as distortion, rattling, a weak or missing sound, or no bass, but loose wiring and wrong settings cause the same symptoms, so rule those out first.
- Test the speaker with a multimeter: a working 4-ohm speaker reads a little below 4 ohms, such as 3.3 ohms on the Kicker CSC65 (Kicker, 2026), while OL means an open voice coil and a reading near zero means a short.
- Small tears in the cone or surround can be sealed with flexible adhesive; a burned voice coil, a scraping coil or a dead tweeter usually means replacing the speaker.
- Most car speakers blow from clipping, which comes from turning up a small head unit or amplifier past its clean limit, often with bass boosted.
- A high-pass filter around 80 Hz and moderate EQ settings stop new speakers from blowing the same way.
To fix blown car speakers, first confirm the speaker is actually damaged: check the balance and fader, swap wiring to rule out the head unit or amplifier, and test the speaker with a multimeter. If it is blown, small cone and surround tears can be repaired with flexible adhesive, but a burned or rubbing voice coil means replacing the speaker. This guide covers each test, what the results mean, and which repairs are worth doing.
How to Tell If Your Car Speakers Are Blown
A blown car speaker usually produces distortion or buzzing at moderate volume, a thin sound with no bass, rattling or scraping, or no sound at all. A partially blown speaker still plays but sounds wrong on every song, not only loud ones.
| What you hear | What it usually means |
|---|---|
| Buzzing or fuzzy sound at any volume | Torn cone, loose surround or voice coil rubbing |
| Thin sound with almost no bass | Damaged cone or surround, or a speaker wired out of phase |
| Crackling that comes and goes | Loose wiring or a failing voice coil connection |
| No sound from one speaker | Open voice coil, broken wire or a disconnected plug |
| Highs missing on a coaxial speaker | Blown tweeter or tweeter crossover |
Listen to each speaker on its own using the balance and fader controls. A single bad speaker is easy to find this way, and comparing it with its partner on the other side tells you what normal should sound like.
Rule Out Problems That Are Not the Speaker
Before removing anything, rule out settings and wiring, because they cause the same symptoms as a blown speaker. Check that the balance and fader are centered, the EQ is not heavily boosted, and the source is not the problem by trying a different song and input.
Then swap the suspect speaker’s signal with a working one. On an amplifier, move the speaker wires to a different channel; if the problem moves with the channel, the amplifier or head unit is at fault, and if it stays with the speaker, the speaker or its wiring is. With a factory stereo, the same test works at the speaker plug if the wires can reach.
Door speakers have one more common failure point: the wires pass through the door hinge in a rubber boot, where they bend every time the door opens. A broken wire there causes crackling that changes when you open or close the door.
Step 1: Remove the Grille and the Speaker
Remove the speaker grille, or the door panel if the speaker is behind it, and unscrew the speaker from its mount. Door panels are held with screws and plastic clips; use a plastic trim tool to avoid cracking them, and disconnect window and lock switches before pulling the panel away.
Take a photo of the wiring before unplugging anything. Most speakers use a plug or two push-on terminals of different sizes, which keeps polarity correct, but aftermarket installs often use crimped connectors that you will need to reconnect the same way.
Step 2: Test the Speaker With a Multimeter
Set the multimeter to its lowest ohms range, disconnect the speaker from its wiring, and touch the probes to the two speaker terminals. A healthy speaker reads a little below its rated impedance; a 4-ohm speaker such as the Kicker CSC65 has a DC resistance of 3.3 ohms (Kicker, 2026).
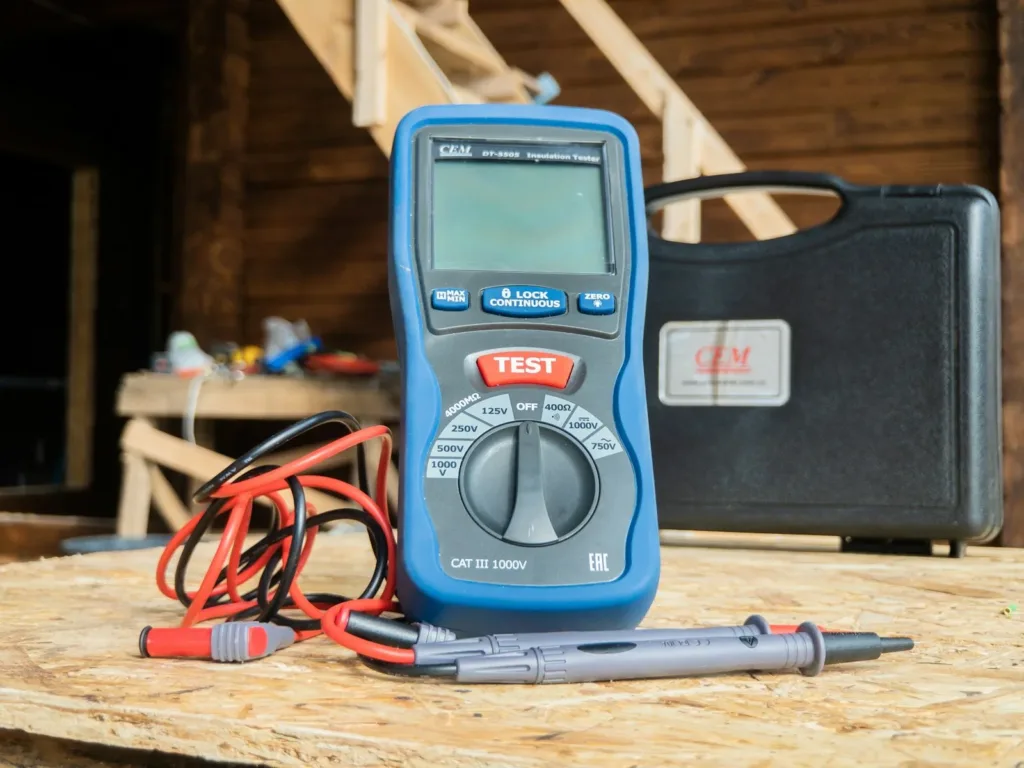
| Reading on a 4-ohm speaker | What it means |
|---|---|
| About 3 to 3.6 ohms | Voice coil is intact |
| OL (open line) | Open voice coil or a broken lead wire; the speaker is blown |
| Close to 0 ohms | Shorted voice coil; the speaker is blown |
| Reading jumps as you press the cone | Intermittent break in the lead wire |
Crutchfield’s guide on how to use a multimeter explains that very low resistance points to a short and very high resistance means a connection inside the speaker has broken (Crutchfield, 2025). Some factory premium systems use speakers rated at 2 ohms or lower, so check the label on the magnet before judging the reading.
Step 3: Try the Battery Pop Test
If you do not have a multimeter, briefly touch a 1.5-volt AA battery to the speaker terminals: positive to positive, negative to negative. A working woofer cone jumps outward with a small pop and moves back when you remove the battery. No movement usually means an open voice coil.
Use only a single 1.5-volt cell and touch it for a moment. Do not try this on a tweeter; tweeters are too small to show movement and can be damaged by direct current. The test also cannot find a rubbing coil or a torn surround, so inspect the speaker as well.
Step 4: Inspect the Cone, Surround and Tweeter
With the speaker out, check the cone for tears and punctures, the surround (the flexible ring around the cone) for cracks or separation, and the tweeter for a dented dome. Press the cone gently and evenly with your fingertips: it should move in and out smoothly and silently.
A scraping or grinding feel means the voice coil is rubbing against the magnet, usually because it overheated and deformed. That cannot be fixed with glue. A cone that sits tilted or off-center points to a damaged spider, the suspension behind the cone, which is also a replacement job on most car speakers.
How to Repair a Torn Cone or Surround
Repair small tears in a paper or polypropylene cone, or in a rubber surround, with a thin layer of flexible adhesive such as clear RTV silicone. iFixit’s speaker surround repair guide uses the same approach, sealing the tear from both sides.
- Clean around the tear with isopropyl alcohol on a cotton swab and let it dry.
- Apply a thin layer of adhesive to the back of the tear, pressing the edges together.
- Once it skins over, apply a second thin layer to the front, feathering it past the edges.
- Let it cure fully, usually 24 hours, then test at low volume first.
Keep repairs thin and light. A heavy patch adds mass to one side of the cone, which can make it wobble and buzz. Foam surrounds that have crumbled all the way around need a replacement surround kit, and speakers that small are rarely worth the effort unless they are part of a premium factory system.
How to Fix a Blown Tweeter
If only the highs are missing, the tweeter has failed while the woofer still works. On component speakers, replace the tweeter on its own if the manufacturer sells it. On coaxial speakers, where the tweeter is mounted in front of the woofer, replacing the whole speaker is usually simpler and cheaper.
Before blaming the tweeter, check its connections and the small crossover capacitor that feeds it, since a broken lead or a failed capacitor silences a working tweeter. A tweeter that crackles or sounds harsh after a loud session has usually overheated from clipping.
When to Replace Car Speakers Instead of Repairing Them
Replace a car speaker when the voice coil is open, shorted or rubbing, when the spider is damaged, or when the tears are large. Factory speakers are inexpensive to replace, and aftermarket speakers usually sound better than the originals, so repair is mainly worth it for small tears or premium factory units that are hard to find.
| Fault | Repair or replace? |
|---|---|
| Loose or broken wire | Repair the wiring |
| Small cone or surround tear | Repair with flexible adhesive |
| Crumbled foam surround | Surround kit, or replace |
| Open, shorted or rubbing voice coil | Replace |
| Dead tweeter on a component set | Replace the tweeter |
| Dead tweeter on a coaxial speaker | Replace the speaker |
When you replace a speaker, measure it first so the new one fits the same mount without cutting. Our guide on how do you measure car speakers covers size, mounting depth and bolt pattern.
Why Car Speakers Blow and How to Prevent It
Most car speakers blow from clipping, not from too much clean power. When you turn up a head unit or amplifier past its clean limit, the signal flattens into a squared-off shape that heats the voice coil far faster than music normally would, especially with bass or loudness boosted.
These habits prevent a repeat:
- Keep bass and treble boosts moderate, and back off the volume as soon as you hear distortion.
- Use a high-pass filter around 80 Hz if your stereo has one, so small door speakers do not waste power trying to play deep bass.
- Match any amplifier’s RMS power to the speakers’ RMS rating and set its gain with a test tone.
- Replace torn or buzzing speakers promptly, because a damaged speaker can pull the rest of the system out of balance.
If you want more volume from your current system, our guide on how to make car speakers louder without amp shows how to get it without clipping. If what you hear is crackling that comes and goes rather than constant distortion, see our guide on how to fix car speakers crackling.
Frequently Asked Questions About Fixing Blown Car Speakers
How do I know if my car speakers are blown?
Listen to each speaker alone with the balance and fader. Distortion at moderate volume, rattling, missing bass or no sound suggests damage. Confirm with a multimeter: a working 4-ohm speaker reads a little below 4 ohms, while OL or a reading near zero means the voice coil has failed.
Can you fix a blown car speaker?
Sometimes. Small tears in the cone or surround can be sealed with flexible adhesive, and wiring faults are easy to repair. A burned, shorted or rubbing voice coil cannot be fixed at home, so the speaker needs replacing.
What does a blown car speaker sound like?
A blown speaker sounds fuzzy, buzzy or scratchy, often on every song and at low volume. Bass may disappear, and a rubbing voice coil adds a scraping sound when the cone moves. A completely blown speaker makes no sound at all.
Can a partially blown speaker damage my stereo?
Usually not, but a shorted voice coil can push an amplifier into protect mode or stress a head unit’s built-in amplifier. Disconnect a speaker that reads close to zero ohms until you replace it.
Why do my car speakers crackle at high volume?
Crackling only at high volume usually means clipping from the head unit or amplifier rather than a blown speaker. Lower bass and treble boosts and the volume. If the crackle stays at low volume, the speaker or its wiring is damaged.
How long do car speakers last?
Car speakers often last the life of the vehicle when they are played within their limits. Foam surrounds can deteriorate with heat and age, and speakers that are regularly driven into clipping fail much sooner.
Summary: How to Fix Blown Car Speakers
- Rule out balance, fader, EQ and wiring before removing a speaker.
- Test the voice coil with a multimeter: slightly under the rated impedance is healthy, OL or zero means it is blown.
- Seal small cone and surround tears with thin layers of flexible adhesive; replace speakers with damaged voice coils.
- Prevent repeat failures by avoiding clipping and filtering deep bass from small speakers.